Google Shopping Ads for Shopify: Complete Setup and Optimization Guide (2026)
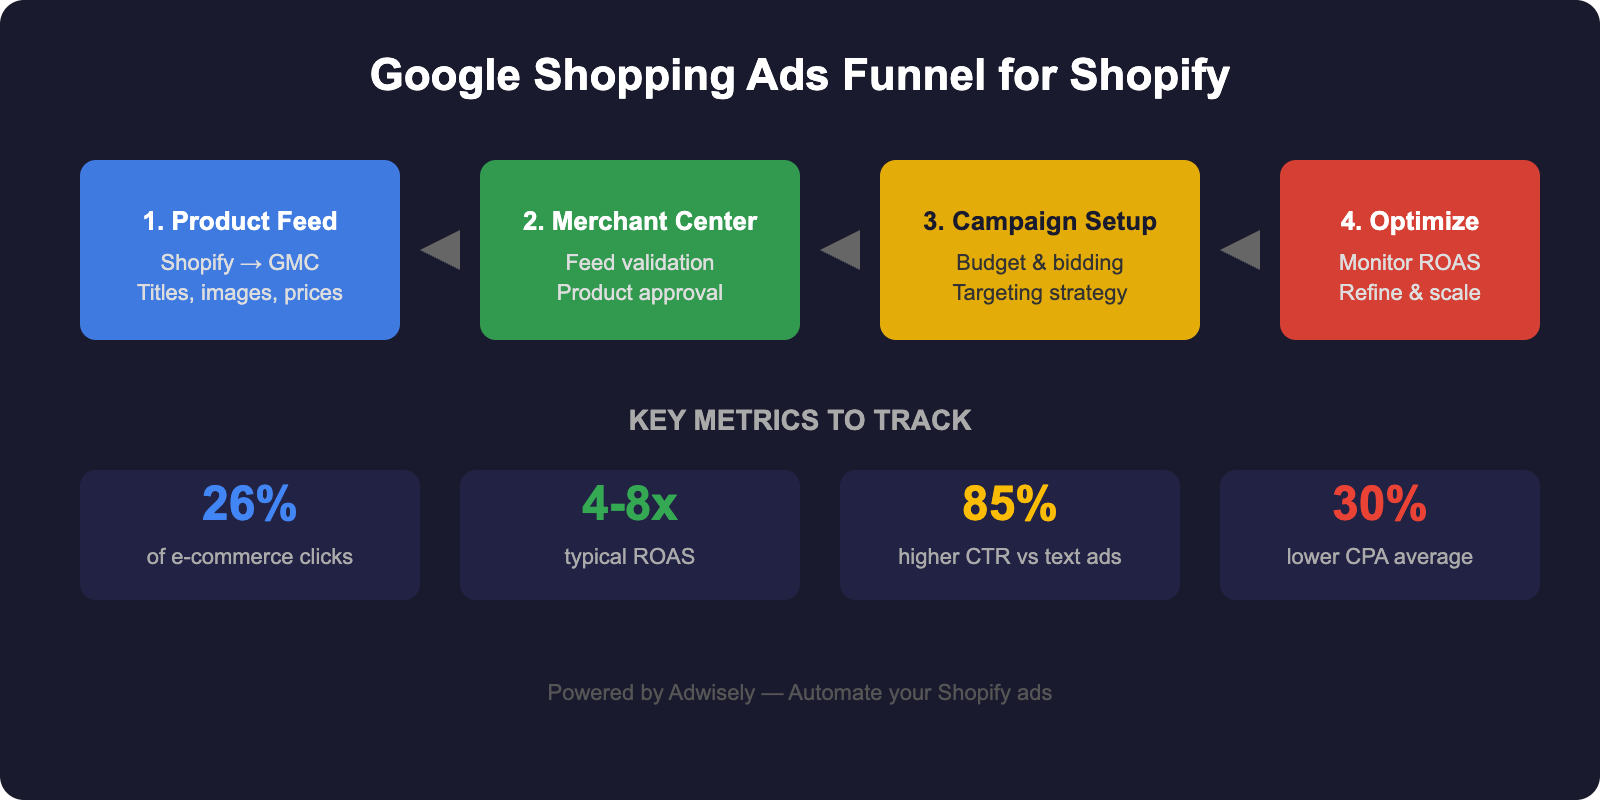
Google Shopping Ads for Shopify drive 26% of all clicks to e-commerce sites — and if you’re running a Shopify store, they might be the highest-ROI channel you’re not using yet. Unlike search text ads that appear alongside competitor bids, Google Shopping puts your products front and center with images, prices, and ratings directly in the search results. For Shopify merchants, that means a direct path from product searcher to checkout.
But getting there requires more than flipping a switch. Your product feed — the backbone of Shopping ads — must be clean, complete, and optimized. Your Merchant Center account has to be configured correctly. And your Shopping campaigns need strategy, not just budget. When properly configured, Google Shopping Ads for Shopify consistently deliver higher ROAS than other paid channels.
This guide walks you through every step: from syncing Shopify products to Google Merchant Center, to building campaigns that don’t waste ad spend on bottom-funnel searchers. If you’ve been intimidated by the technical side of Google Shopping Ads for Shopify, or if you’ve tried and hit disapprovals, this is your roadmap to fixing it.
Contents
Why Google Shopping Ads Matter for Shopify Stores
When someone searches “black leather backpack” on Google, they’re not looking for an article. They’re looking to buy. And when Google surfaces your product listing with a photo, your price, and your reviews, you’ve already won half the battle.
Here’s what makes Shopping ads different:
- Higher intent. Shopping searches are buyer searches. You’re not competing for attention against informational content.
- Product-level data. Google displays your image, title, price, and rating — all the details a shopper needs to decide before clicking.
- Better CTR. Shopping ads convert at 2–5x higher rates than text ads for product queries, depending on your category.
- Auction transparency. You see which products are bidding, their prices, and their positions. No guesswork about what your competitors are doing.
- Feed automation. Once your feed is set up, products sync automatically as you update inventory and pricing in Shopify. This seamless integration is what makes Google Shopping Ads for Shopify so powerful for growing stores.
For Shopify merchants, Google Shopping Ads for Shopify are the fastest way to capture high-intent traffic at scale — especially if you have hundreds or thousands of products. A single text ad can only say so much. A product feed says everything.
Google Shopping Ads vs. Search Text Ads: When to Use Each
Your first instinct might be: “I’ll run both.” You should. But they serve different purposes.
Search Text Ads (Keywords + Copy)
- You bid on keywords and write ad copy that explains your value prop.
- Best for informational and early-stage searches: “best backpack under $100,” “waterproof laptop bag.”
- You control the narrative. You can highlight free shipping, a limited-time discount, or your brand story.
- Lower average CTR, but you can bid competitively on brand + high-intent commercial keywords.
Google Shopping Ads (Product Feed + Images)
- You upload a product feed with SKU-level data. Google shows the product itself — image, price, rating, store name.
- Best for product-specific searches: “[brand] black leather backpack,” “leather backpack 30L,” exact product model names.
- Higher CTR because the visual + price data closes the sale before the click.
- Zero control over ad copy (Google writes it). You compete on product data quality, image quality, price, and reviews.
The strategy: Text ads capture the top of funnel and build demand. Shopping ads close the bottom of funnel. A user might click your text ad for “backpacks for travel,” then come back a week later searching for your specific model and click your Shopping ad. Both channels matter.
How Google Shopping Works: The Product Feed Flow
Before you build a campaign, you need to understand the plumbing. Shopping ads don’t exist in isolation — they’re the visible tip of a larger system.
Here’s the flow:
- 1. Your Shopify store houses your products, inventory, and pricing in real time.
- 2. Google’s Shopify app (or a third-party connector like Adwisely) simplifies Google Shopping Ads for Shopify by pulling your product data and pushing it to Google Merchant Center automatically.
- 3. Merchant Center is Google’s data hub. It validates your feed, checks for errors (like missing GTINs or bad images), and stores your product information.
- 4. Google Ads pulls your products from Merchant Center and uses them to serve Shopping ads when a searcher matches your target audience and keywords.
- 5. The auction happens in milliseconds. Google ranks shopping ads by bid, quality score, and relevance — then serves the winning products.
- 6. Click to cart. Shopper clicks your ad, lands on your product page, and (hopefully) buys.
The key insight: if your product data is wrong, incomplete, or missing, your ads won’t show up — or they’ll show up to the wrong people. Most Shopify merchants’ first issue isn’t bidding strategy or campaign structure. It’s a messy product feed.
Setting Up Google Merchant Center for Shopify: Step by Step
Step 1: Create a Google Merchant Center Account
- Go to merchantcenter.google.com and sign in with the same Google account you use for Google Ads.
- Click Create Account, select your country, and enter your website URL (your Shopify store domain).
- Verify your website by uploading an HTML file to your store root, or via Google Search Console (if you’ve already verified it there).
- Add your business information: legal entity name, business address, phone number, and primary language.
- For “Account Type,” select Merchant (not Affiliate).
Step 2: Connect Shopify via Google’s Official App
- In Merchant Center, go to Tools > Product Feeds.
- Click Create Feed, select Shopify as your platform, and choose your target country and language.
- You’ll be redirected to Shopify’s app store. Install the “Google & YouTube” official app.
- Return to Merchant Center and authorize the app to access your product catalog.
- In the Shopify app, toggle ON the Google Shopping feed toggle. This starts syncing your products.
Step 3: Verify Your First Feed Sync
- Go back to Merchant Center > Product Feeds. You’ll see your feed with a status of “Processing.”
- Wait 24–48 hours for the first sync. Google ingests your products, checks them for errors, and flags any issues.
- Once complete, check the Diagnostics tab. This is the most important view in Merchant Center.
- You’ll see three buckets: Approved (products ready for ads), Warnings (minor issues, products still show), and Errors (products won’t show until fixed).
Step 4: Fix Feed Errors and Warnings
This is where most Shopify merchants get stuck. Common errors:
- “Missing GTIN” (Global Trade Item Number): If your products have barcodes, add them to Shopify’s product data. If not, use SKU as a fallback (tell Google to accept it).
- “Missing description”: Write product descriptions in Shopify. Google needs at least 5 words.
- “Invalid price format”: Make sure prices include currency and are in the format “19.99 USD” (not “$19.99” or “19.99” alone).
- “Image URL not accessible”: Verify your images are hosted on Shopify’s CDN (they should be by default). If using custom images, ensure the URLs are HTTPS, not HTTP.
- “Missing shipping info”: This is optional initially but required for Shopping ads in most categories. Add shipping weight and cost in Shopify settings and Merchant Center.
Most of these can be fixed in Shopify’s product editor in bulk via CSV import. In Merchant Center, you can also set rules to auto-correct formatting issues (e.g., “use title + brand as the product description if description is missing”).
Optimizing Your Product Feed for Shopping Ads
Once your feed is error-free, optimization begins. Here’s how to make your products stand out in the auction.
1. Product Titles
Your title is the #1 ranking factor in Shopping ads. Google uses it to understand your product and match it to shopper searches.
- Include the key descriptor: Brand + Product Type + Key Attribute. “Patagonia Men’s Refugio 28L Backpack” is better than “Backpack” or “Blue Bag.”
- Front-load keywords: Put the most important terms first. “Waterproof hiking backpack” ranks better than “Backpack, waterproof, hiking.”
- Don’t keyword-stuff. “Backpack backpack waterproof backpack hiking” will tank your quality score. Keep titles under 150 characters.
- Use your Shopify title field, but test variations. Some merchants see better performance with slightly different titles in Merchant Center vs. on-site.
2. Product Images
- Use your best image. The first image in your feed is what Google prioritizes. Make sure it’s a clear, straight-on product shot with white or neutral background. No lifestyle photos, text overlays, or blurry shots.
- Match your site. If your product page shows the item in use, that’s fine for your website — but your Shopping feed image should be clean and recognizable.
- Size matters. Google wants images at least 800 x 800 pixels, but 1200 x 1200 or larger is better for mobile and retina displays.
- HTTPS only. All image URLs must use HTTPS. If Shopify is serving them over HTTP, fix it in your CDN settings.
3. Price and Availability
- Real-time sync: Make sure your Shopify price and inventory feed into Merchant Center in real time. Out-of-stock products get disapproved and stop showing ads.
- Sale price: If you’re running a promotion, add a separate “sale price” field (distinct from regular price). Google will show “Was $49, now $39” on your ad.
- Currency. Make sure your price format matches your target country. USD, EUR, GBP, etc.
4. GTINs and Brand
- GTIN (barcode) or SKU. Google prefers real GTINs (UPC, EAN). If you don’t have them (e.g., for custom or white-label products), use your SKU and set the GTIN warning rule to “Ignore.”
- Brand. Always include your brand name. Google uses this to rank and de-duplicate products.
- Condition. Set this to “New” for new products. “Used” and “Refurbished” require extra approval steps.
5. Custom Labels
Custom labels are one of the most underused features in Google Shopping. They let you tag products (e.g., “High Margin,” “New Arrival,” “Flash Sale”) and then create campaigns or bid adjustments based on those tags.
- Add custom label data in Shopify using a metafield or via CSV bulk upload.
- Use labels to segment your feed. Example: label_0 = “Category: Backpacks,” label_1 = “Margin: High,” label_2 = “Season: Summer.”
- In Google Ads, create separate campaigns for high-margin products vs. low-margin (and bid accordingly).
- During flash sales, add a “Flash Sale” label and temporarily increase bids on those products.
Creating Your First Google Shopping Campaign
Two Campaign Types: Standard Shopping vs. Performance Max
When you create a new campaign in Google Ads and select “Shopping,” you’ll have two options.
Standard Shopping Campaigns
- You build the structure. You create ad groups, organize by product category or margin, set bids manually, and review search terms.
- You have control. You can exclude products, set product-level bid adjustments, and see exactly which searches triggered your ads.
- Best for: Merchants who want transparency and are comfortable with campaign management. Or if you have a diverse product catalog with very different conversion rates by category.
- Starting point: If you’re new to Shopping, start here. You’ll learn how the auction works before you hand it off to automation.
Performance Max (Automated)
- Google does the bidding. You set a target ROAS (return on ad spend — see our ROAS guide), budget, and product data, and Google’s AI optimizes bids and placement across all its channels (Google Search, Shopping, YouTube, Gmail, etc.).
- Faster scaling. If your conversion data is clean, Performance Max can scale faster than manual bidding. No need to wait for you to adjust bids every week.
- Less transparency. You don’t see search terms or bid-level data. You see top-level metrics: impressions, clicks, conversions, ROAS.
- Best for: Mature stores with 50+ conversions per month (so Google has enough data to optimize). Or if you’re using a tool like Adwisely that layers on-top optimization and feed management.
Recommendation for Shopify merchants: Start with a Standard Shopping campaign to learn the ropes. Once you have 30+ conversions per month and understand your conversion rates by product category, graduate to Performance Max or Advantage+ Shopping (Meta’s equivalent) to automate scaling.
Setting Up Your First Standard Shopping Campaign
- In Google Ads: Click + Campaign, select Shopping, choose Sales (not Leads or Traffic).
- Link your Merchant Center account. Google will populate your primary product feed automatically.
- Set your daily budget. Start conservative: $20–50/day if you’re testing, $100+/day if you want meaningful volume.
- Choose your bidding strategy: Manual CPC for now. (We’ll cover advanced strategies next.)
- Create your first ad group. Name it something like “All Products” or “High Margin.” Set a default max CPC bid.
- Add product subdivisions (optional but recommended). Subdivisions let you bid differently on different product groups. Example: bid $5 on “Backpacks > 40L” and $2 on “Backpacks > 20L”.
- Review and launch. Double-check your Merchant Center link, budget, and bid. Hit publish.
Bidding Strategies for Shopify Stores
Bidding is where Google Shopping Ads for Shopify get strategic. Your bid strategy determines how aggressively you compete for traffic and how much you spend per click. For Shopify merchants, the right strategy depends on your maturity and data volume.
Stage 1: Manual CPC (Your First 30 Days)
- You set a max CPC bid. Google doesn’t go higher. You can adjust daily, by product group, or by device.
- Best for: Learning. You’ll see which products get clicks, which convert, and how much you’re willing to pay per conversion.
- How to start: Look at your average order value (AOV). If your AOV is $100 and you target a 3:1 ROAS, you need to make $300 per $100 spent. That’s a $3 target cost per conversion (assuming 1 conversion per click). If your conversion rate is 5%, you can bid $0.15 per click max. Start there and refine based on actual data.
Stage 2: Target Return on Ad Spend (tROAS)
- You set a ROAS target. Google’s algorithm bids to hit that target. If you target 3:1 ROAS and have $100/day budget, Google aims to generate $300 in revenue.
- Best for: Stores with 30–100+ conversions per month and clean conversion tracking.
- How to use it: In Google Ads, change your bidding strategy to “Target Return on Ad Spend (tROAS).” Set your target (e.g., 3.0). Google uses your historical conversion data to predict which clicks are likely to convert and bids accordingly.
- Caveat: If your conversion tracking is broken or incomplete, tROAS will tank your performance. Make sure you’ve set up Google Ads conversion tracking for your Shopify store (via Google Analytics 4 or Shopify pixel).
Stage 3: Maximize Conversions or Maximize Conversion Value
- Maximize Conversions: Google bids to get the most conversions for your budget, regardless of value. (Not ideal for Shopify — you care about revenue, not just orders.)
- Maximize Conversion Value: Google bids to maximize revenue for your budget. This is tROAS’s cousin and works well for diverse product catalogs with varying profit margins.
- Best for: Scaling. Use this once you’re comfortable with Shopping campaigns and want to hand off bidding to Google’s AI.
Pro Tip: Bid by Product Margin
One of the most effective strategies for Shopify merchants is to bid differently on products based on profit margin. A $100 product with 40% margin should get a higher bid than a $100 product with 10% margin.
- Create product groups in your ad group based on custom labels (e.g., “High Margin,” “Standard Margin,” “Low Margin”).
- Set bid adjustments. High Margin: +30%, Standard: 0%, Low Margin: -50%.
- This ensures your budget flows to your most profitable products. Even if your overall ROAS is 2.5:1, your high-margin products might be 4:1.
Structuring Your Shopping Campaigns for Scale
A well-structured campaign makes optimization easier and prevents wasted spend. Here’s how to think about it.
Campaign Priority
- Set campaign priority to “High” or “Medium” so Shopping ads compete effectively against your search text ads.
- If you have multiple Shopping campaigns (e.g., one for “Backpacks” and one for “Accessories”), set the highest-performing one to “High” priority. This ensures budget goes to your best performer first if you hit daily limits.
Ad Group Organization
- Option 1: One ad group, multiple product groups. Simplest. Useful if you have a small catalog (under 500 products) with similar margins and conversion rates.
- Option 2: Multiple ad groups by category. Create separate ad groups for “Backpacks,” “Accessories,” “Clothing.” Each gets its own bid strategy. Useful if you have high volume and want category-level control.
- Option 3: Multiple ad groups by product group (margin/seasonality). Create separate ad groups for “High Margin,” “Seasonal,” “Clearance.” This lets you adjust bids aggressively by profit or timing.
Negative Keywords
Negative keywords tell Google: “Don’t show my ads when someone searches for this term.” For Shopify stores, they prevent wasted spend on off-target traffic.
- Common negatives for e-commerce: -free, -cheap, -used, -fake, -illegal, -DIY. Example: If you sell brand-name backpacks, add -used -knockoff so your ads don’t show for “used backpack” or “fake gucci backpack” searches.
- Brand negatives: If you don’t sell a competitor’s brand, add their name as a negative. Example: If you don’t sell The North Face but you sell Patagonia, add -north -face to prevent your ads showing when someone searches “north face backpack.”
- Apply at the campaign level. This way all ad groups inherit the same negatives and you don’t have to manage them separately.
Measuring and Optimizing Your Shopping Campaigns
Launch day is step one. The real work is optimization. Here’s how to measure, diagnose, and improve your Shopping campaigns over time.
Key Metrics to Track
- Impressions: How many times your products appeared in search results. High impressions + low clicks = your bids are competitive but your product data or images aren’t compelling.
- Click-through rate (CTR): Clicks ÷ Impressions. Shopping ads typically see 3–8% CTR, depending on category and competition. (That’s 3–8x higher than text ads.)
- Cost per click (CPC): How much you pay per click. Shopping ads average $0.50–$3.00 CPC depending on category and competition. High CPC = competitive market or broad bids.
- Conversion rate: Orders ÷ Clicks. Typical for e-commerce: 1–5%. Lower than you’d like? Your product pages or checkout might be slow or confusing.
- ROAS (Return on Ad Spend): Revenue ÷ Ad Spend. This is your north star. If your target is 3:1 and you’re doing 2.5:1, you need to optimize — either reduce spend or increase conversion rate.
Diagnose with Search Terms Report
- In Google Ads, go to Keywords > Search Terms (for Standard Shopping campaigns).
- You’ll see the exact searches that triggered your ads. Are people searching for your products or something else?
- Example: If you sell “premium backpacks” but you’re getting a lot of impressions for “cheap backpack,” those users might not convert (wrong price expectation). Add “cheap” and “budget” as negatives.
- Another example: If “hiking backpack” gets high CTR but low conversion, maybe your product descriptions don’t emphasize weather resistance or comfort. Go back and optimize your feed.
Suppress Low Performers
- Identify products with high impressions but zero conversions. These are wasting budget. Either remove them from your feed, or exclude them from Shopping ads in your product group.
- In Google Ads, create a product group subdivision: “Exclude: [Product Category]” and set max CPC to $0. This pauses ads for that product without removing it from your feed.
- Or, go back to Shopify and fix the product. Maybe the title is misleading, the image is blurry, or the price is too high. Re-optimize and test again.
Seasonal Adjustments
- Use scheduling to increase bids during peak seasons. If summer is your busy season, increase bids by 20–30% May–August.
- Or, create a separate “Seasonal” campaign with a higher budget that runs May–August. Pause it off-season to preserve budget.
- Use custom labels in your feed. Tag products as “Summer” or “Winter,” then create bid adjustments per season.
Optimization Cadence
- Week 1–2: Launch and learn. Let data accumulate. Don’t make changes yet.
- Week 3–4: First optimization pass. Review search terms, suppress low performers, add negatives.
- Month 2+: Ongoing optimization. Adjust bids weekly based on ROAS, test new product group segments, refresh your feed with new images or titles.
- Quarterly: Deep dive. Review seasonal trends, product mix changes, and competitor activity. Adjust strategy accordingly.
Automation and Tools for Shopify Google Shopping
Managing a Google Shopping campaign manually — syncing product feeds, monitoring ROAS, adjusting bids — takes time. For Shopify merchants with hundreds of products and multiple channels, it’s easy to fall behind.
This is where tools like Adwisely come in. Adwisely automates three critical things for Shopify merchants:
- Feed management: Automatically syncs your Shopify product data to Google Merchant Center and Meta, validates feeds, and flags errors before Google disapproves your ads.
- Bid optimization: Continuously adjusts bids to hit your target ROAS, without you having to manually update bids every week.
- Performance tracking: Gives you a unified dashboard across Google Shopping, Meta Ads, and other channels so you can see your full marketing ROI in one place.
If you’re running Google Shopping Ads for Shopify on a budget or managing multiple campaigns, automation frees up time for strategy instead of tactics. Visit Adwisely.com to learn more.
Common Mistakes With Google Shopping Ads for Shopify and How to Fix Them
Mistake 1: Poor Product Titles
Problem: Generic titles like “Backpack” or “Blue Bag” don’t tell Google (or shoppers) what you’re selling. Audit your Shopify product titles. If they’re short or vague, update them.
Fix: Rewrite titles as “[Brand] [Product Type] [Key Attribute].” Example: “Peak Design Travel Backpack 45L Carryon.”
Mistake 2: Incomplete or Missing Images
Problem: Blurry images, lifestyle shots, or images with text overlays kill CTR. Google Shopping relies on image quality to compete in the auction.
Fix: Audit your Shopify product images. Make sure the first image is a clear, straight-on product shot with white background. Upload higher-resolution images (1200×1200 or larger).
Mistake 3: Broken Conversion Tracking
Problem: If Google Ads isn’t tracking conversions from your Shopify store, you have no data to optimize with. Your ROAS will be skewed or missing.
Fix: Set up Google Analytics 4 (free) or use Shopify’s built-in Google Ads pixel. In Google Ads, create a conversion action for “Purchase” and link it to your GA4 property or Shopify events. Test it to make sure conversions are flowing in.
Mistake 4: Bidding Without Data
Problem: Setting bids before you know your conversion rate or average order value. You’ll overpay for clicks.
Fix: Start with Manual CPC and a conservative bid (e.g., $0.50 if you’re unsure). Let data accumulate for 2 weeks, then use your actual conversion rate to inform your tROAS bid.
Mistake 5: One Campaign for Everything
Problem: Throwing all products into one campaign with one bid. High-margin products don’t get the bids they deserve, and you can’t optimize by category or season.
Fix: Start with one campaign to learn, but graduate to multi-campaign or multi-ad-group structure. Bid higher on high-margin products, seasonal items, and new launches. Lower bids on clearance or low-margin stock.
Integrating Google Shopping with Other Channels
Google Shopping shouldn’t exist in isolation. It’s part of your broader e-commerce marketing mix. Here’s how to integrate it with other channels for maximum ROI.
Google Shopping + Google Search Ads
- Shopping ads capture high-intent product searches. Search ads capture the funnel above and below: informational searches (“best backpacks for hiking”) and brand searches (“peak design backpacks”).
- Set your search campaign priority to Medium and your Shopping campaign to High. This ensures Shopping gets first dibs on product-specific searches, and search picks up the rest.
- Use negative keywords in search to avoid bidding on terms that trigger Shopping ads. Example: if you’re bidding on “backpack,” exclude branded models that already appear in Shopping.
Google Shopping + Retargeting (Remarketing)
- Users who click your Shopping ad but don’t buy are your warmest audience. Show them remarketing display ads or video ads on YouTube to remind them to complete their purchase.
- Use Google Analytics to create a “Add to Cart but Didn’t Purchase” audience, then target them with Shopping remarketing campaigns.
- This typically has a higher conversion rate than cold traffic and a better ROAS.
Google Shopping + Meta (Facebook/Instagram)
- Your product feed for Google Merchant Center can also feed Meta ads. Both platforms can pull from the same Shopify catalog.
- Meta’s Advantage+ Shopping campaigns work similarly to Google Performance Max: you set a ROAS target, upload your feed, and Meta optimizes.
- Run Google Shopping for high-intent (bottom funnel) and Meta for awareness/discovery (top funnel). Together, they cover the full funnel.
FAQ: Google Shopping Ads for Shopify
Q1: Do I need a Google Ads account to run Google Shopping ads?
A: Yes. You need both a Google Ads account (to create campaigns and manage bids) and a Google Merchant Center account (to host and validate your product feed). They’re free to set up and can be linked to the same Google account. Your Ads account pulls from your Merchant Center feed.
Q2: How long does it take to see results from Google Shopping ads?
A: Initial impressions appear within hours. But meaningful data (enough clicks and conversions to optimize) takes 2–4 weeks. If you’re getting no impressions after a week, your feed likely has errors or your bids are too low. Check your Merchant Center diagnostics and your campaign CPC settings.
Q3: What’s a good ROAS target for Google Shopping?
A: It depends on your margin and business model. As a starting point: target 3:1 ROAS if you have 30%+ profit margin. Target 2:1 if you have 15–30% margin. If you’re below 15%, Shopping ads might not be profitable until you improve margins or reduce ad spend. Use tROAS bidding to automatically hit your target without manual intervention.
Q4: Can I run Google Shopping ads on international marketplaces (not US)?
A: Yes. Google Merchant Center supports 40+ countries and languages. Create a separate feed for each country (e.g., one for US, one for UK), set the country and language in your feed settings, and link each to a separate Google Ads campaign. Pricing, shipping, and tax rules should be configured per country in Merchant Center.
Q5: How often should I update my product feed?
A: Real-time is ideal. The Google & YouTube Shopify app syncs automatically, so when you update price or inventory in Shopify, it flows to Merchant Center within minutes. For major changes (new products, seasonal shifts), your feed should update daily at minimum. If using third-party tools, ensure they sync at least once per day to stay competitive.
Keep Reading
If you found this guide helpful, check out these related resources for Shopify store owners:
- TikTok Ads for Shopify: The Complete Guide to Running Profitable Campaigns in 2026
- AI Agents for Shopify Ads: How Smart Store Owners Are Automating Their Ad Campaigns
Ready to automate your Google Shopping campaigns? Try Adwisely free for 14 days — set up your first campaign in under 5 minutes.
Next Steps: Launch Your Google Shopping Campaign Today
You now have the complete blueprint for Google Shopping Ads for Shopify. Here’s your action checklist:
- Day 1: Create a Google Merchant Center account, install the Google & YouTube Shopify app, and link your product feed.
- Day 2: Wait for the first sync (24–48 hours). Review your Merchant Center diagnostics and fix any feed errors.
- Day 3: Create your first Google Shopping campaign in Google Ads. Set a conservative daily budget and launch.
- Week 2–4: Monitor performance. Review search terms, suppress low performers, refine your product feed.
- Month 2+: Scale based on ROAS. Adjust bids, create product group subdivisions, experiment with bidding strategies.
If feed management, bid optimization, or reporting becomes overwhelming, consider using a tool like Adwisely that automates these tasks for Shopify merchants running Google and Meta ads. It’s a force multiplier when you’re scaling.
Your Shopify store has competitive inventory, strong product images, and a checkout your customers trust. Google Shopping is the fastest way to put your products in front of high-intent buyers. The setup takes a day. The returns compound for years.
Get started today.


